Grant Types
CloudCompli uses the OAuth 2.0 protocol for authentication and authorization of its API. Depending on your use case, CloudCompli supports two different grant types:
- The Client Credentials grant type is used by API consumers that interact with CloudCompli at a system level. When leveraging the Client Credentials grant type, an API consumer has full visibility of the data sets stored on CloudCompli. For security, consumers that use this grant type are restricted to a single customer instance of CloudCompli. The Power BI Analytics Development Kit is an example of a consumer that uses this grant type.
- The Authorization Code grant type is used by API consumers to act on behalf of a user when interacting with CloudCompli. When leveraging the Authorization Code grant type, an API consumer has the same access and permissions as the user has when interacting with CloudCompli via the CloudCompli web interface. Consumers that this grant type may be written to support multiple customer instances of CloudCompli. The CloudCompli iOS and Android applications are examples of consumers that use this grant type.
If you are unsure which grant type is appropriate for your integration, please contact CloudCompli Support.
Client Credentials
The Client Credentials grant type provides a way for a system to integrate with the global dataset you are storing within CloudCompli. This grant type is available to all CloudCompli customers and may be set up via the self-service API Client manager within your CloudCompli admin settings.
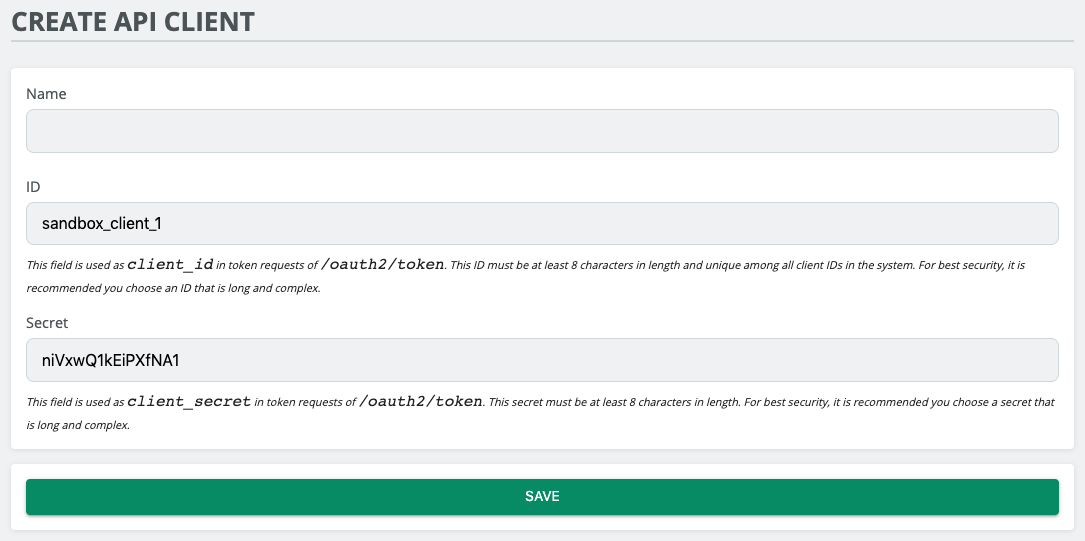
To get started, visit Settings > App Settings > API Clients and press Create API Client:
CloudCompli will generate a random client ID and secret, although you are welcome to change these to suit your own needs.
Once you have created a new API client (or go to Manage for an existing API token), you will be presented with the following screen:
From here, you have several options:
- Generate a Token: This will generate a Bearer token for you that you can include in your API requests. It will expire one year from creation date or when you revoke all tokens.
- Revoke All Tokens: This will remove all Bearer tokens associated with this API client. Any existing integrations with a Bearer token will need new tokens in order to connect to the API.
- Programmatically Generate a Token: This page also includes documentation explaining how one can programmatically generate a Bearer token if generating one through the UI is not desired.
For a use case like the Power BI Analytics Development Kit, we recommend that you Generate a Token through the user interface and then drop that token into the connector authentication details. However, for other integrations you may be working on, it may work better to issue your own token request programmatically.
Here is an example of the minimal HTTP request to generate a Bearer token:
POST /oauth2/token HTTP/1.1
Host: example.compli.cloud
Content-Length: 73
Content-Type: application/x-www-form-urlencoded
Accept: application/json, */*
Cache-Control: no-cache

grant_type=client_credentials&client_id=MY_CLIENT&client_secret=MY_SECRET
The response body will be of the form:
{
    "access_token": "SzmD1ujg3pHKfm0PjUWTFbfEQXbGEwYzFeyWafDF",
    "token_type": "Bearer",
    "expires_in": 31536000
}
All subsequent request to the API should then include the following HTTP header:
Authorization: Bearer SzmD1ujg3pHKfm0PjUWTFbfEQXbGEwYzFeyWafDFAuthorization Code
The Authorization Code grant type provides a way for an application to leverage a user's login to CloudCompli (think of this similar to the "Login with Google" feature that many applications provide). This approach is available to both CloudCompli customers as well as third-party application development partners.
To get started, please contact CloudCompli Support. You will need to specify for then an Endpoint URI (where a user is redirected upon logging into CloudCompli and authorizing access to your application). CloudCompli Support will then provide you with a client ID and client secret.
In this method, when a user is to be logged into CloudCompli, you will redirect them to the following URL (using your URL instead of example.compli.cloud):
https://example.compli.cloud/oauth2/authorize?response_type=code&client_id=MY_CLIENT&client_secret=MY_SECRET&redirect_uri=MY_ENDPOINTThe user will be prompted to log into CloudCompli, if they are not already logged in, and then asked if they wish to login with CloudCompli to your API consumer. If they assent, they will be redirected to your redirect_uri with a GET parameter code. This code parameter should then be submitted as part of a token request as follows:
POST /oauth2/token HTTP/1.1
Host: example.compli.cloud
Content-Length: 148
Content-Type: application/x-www-form-urlencoded
Accept: application/json, */*
Cache-Control: no-cache

response_type=code&client_id=MY_CLIENT&client_secret=MY_SECRET&redirect_uri=MY_ENDPOINT&grant_type=authorization_code&code=MY_CODE_FROM_REDIRECT_URI
The response body will be of the form:
{
    "access_token": "SzmD1ujg3pHKfm0PjUWTFbfEQXbGEwYzFeyWafDF",
    "token_type": "Bearer",
    "expires_in": 31536000
}
All subsequent request to the API should then include the following HTTP header:
Authorization: Bearer SzmD1ujg3pHKfm0PjUWTFbfEQXbGEwYzFeyWafDF


